
Here’s a Quick & Easy Guide to Fix the Leverage Browser Caching Warning Message
GTmetrix and Google PageSpeed Insights are tools users use to measure their website’s performance. Henceforth, many suggestions are given in the results provided by these performance measuring tools. Among them is the ‘Leverage Browser Caching’ warning, which is often confusing for new website owners.
Breaking down caching isn’t that challenging to understand, and it’s quite easy to resolve with a few tweaks. For instance, by implementing some good development practices, you can reduce loading times, which will improve your PageSpeed score.
However, that’s not always the case, and many times, users realize this issue later on. Therefore, it becomes the question of how to resolve this WordPress warning message ‘The Leverage Browser Caching.’ If you’re among those who have this question, you’re reading the right article!
Let’s dive into it.
Here’s How to Fix the Leverage Browser Caching Warning into Your WordPress Website
For fixing the Leverage Browser Caching there’s more than one way within your WordPress website, depending upon what causes this leverage browser caching issue. Here, we’ve three different solutions that will most likely resolve it.
Add Expires Headers & Cache Controls
There are two different types of headers for browser caching, namely, Expires and Cache-Control. Here, Expires header is helpful to specify a fixed date and time for the expiry of a cached resource. For instance, Expires: Fri, 30 April 2021 07:00:00 GMT tells all the cached resource will expire on April 30th, 2021 at 7:00 am GMT. On the other hand, the Cache-Control header specifies policies of browser caching in both server responses and client requests. Here, policies define how the resource should be cached, where it should be cached, and the maximum age before it expires. For example, cache-control: max-age=120 means the returned resource will remain valid only for 120 seconds, and after that, it’ll expire, and the browser has to request a newer version.
Nonetheless, it’s recommended that at least one should be present to enable browser caching for your WordPress website. Because browsers need to determine how long they should retain resources before refreshing.
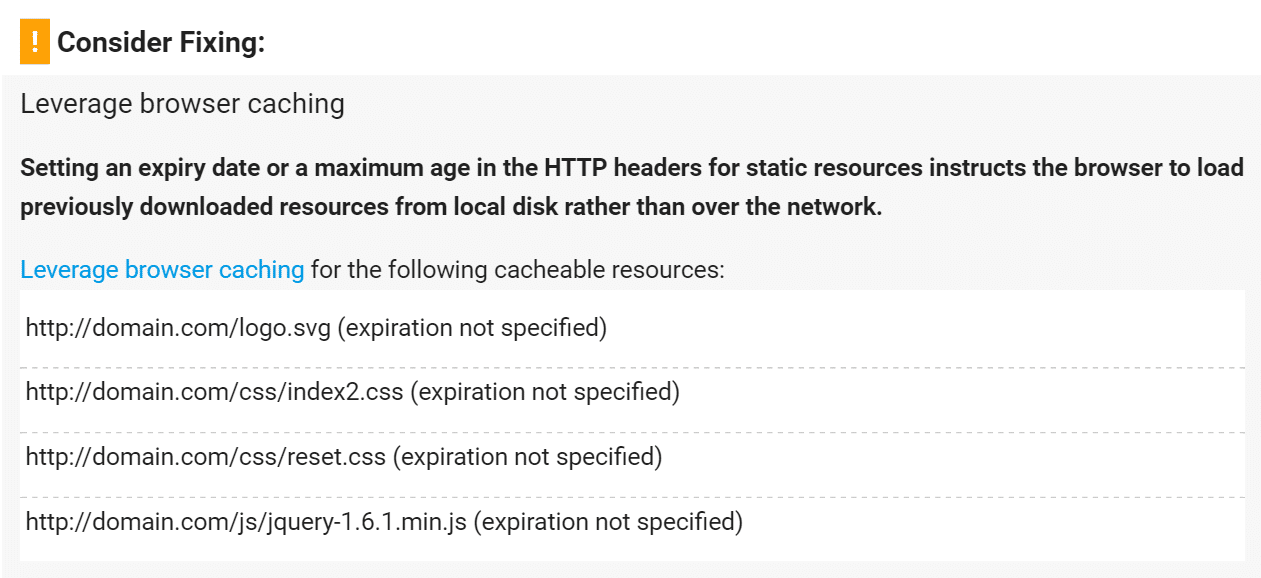
An easier way to confirm whether Expires Headers and Cache Controls are creating the Leverage Browser Caching warning is to go through the details provided from every resource. For instance, in Google PageSpeed Insights version 5 onwards, you’ll see “None” listed under Cache TTL.

Likewise, you don’t need to add both of them as it can become redundant. For instance, it’s enough to go with the Cache-Control, which is also a newer and recommended method. Though, tools like GTmetrix still verify Expires headers as well.
If you’ve hosted your website on a respected and secure hosting provider, you won’t need to worry about such settings of headers. Because their servers already include them. And even those who use CDN already have such headers applied.
Unlike if you’re using any of your local hosting providers or it doesn’t have that included, you can do it manually. But, before you move any further, we recommend taking a complete backup of your site using a good tool such as CodeGuard Backup. Because editing .htaccess can break your entire website if anything goes wrong.
Here’s How to Add Cache-Control in Nginx Server
Add the lines of code below into the configuration file to add Cache-Control headers in your Nginx server:
location ~* \.(js|css|png|jpg|jpeg|gif|svg|ico)$ {

expires 30d;

add_header Cache-Control "public, no-transform";

}Here’s How to Add Cache-Control in Apache Server
For Apache server, add code below within the .htaccess file:
<filesMatch ".(ico|pdf|flv|jpg|jpeg|png|gif|svg|js|css|swf)$">

Header set Cache-Control "max-age=84600, public"

</filesMatch>Here’s How to Add Expires Headers in Nginx Server
Go through the below code snippet to add Expires headers within the Nginx server. For example, here it’s showed how you could specify different expiration times depending upon files:
location ~* \.(jpg|jpeg|gif|png|svg)$ {

expires 365d;

}
location ~* \.(pdf|css|html|js|swf)$ {

expires 2d;

}
Here’s How to Add Expires Header in Apache Server
Insert the code snippet below within the .htaccess file and it’ll be added into your site’s Apache server:
## EXPIRES HEADER CACHING ##


ExpiresActive On

ExpiresByType image/jpg "access 1 year"

ExpiresByType image/jpeg "access 1 year"

ExpiresByType image/gif "access 1 year"

ExpiresByType image/png "access 1 year"

ExpiresByType image/svg "access 1 year"

ExpiresByType text/css "access 1 month"

ExpiresByType application/pdf "access 1 month"

ExpiresByType application/javascript "access 1 month"

ExpiresByType application/x-javascript "access 1 month"

ExpiresByType application/x-shockwave-flash "access 1 month"

ExpiresByType image/x-icon "access 1 year"

ExpiresDefault "access 2 days"


## EXPIRES HEADER CACHING ##
Haven’t solved it yet? Let’s try another method.
Google Analytics Can Be the Reason Behind the Leverage Browser Caching Warning
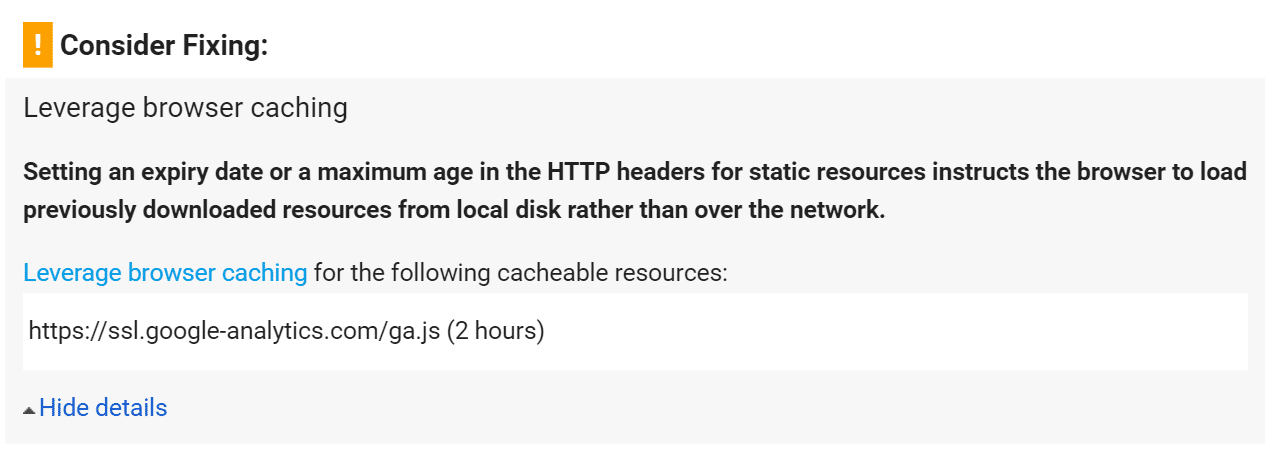
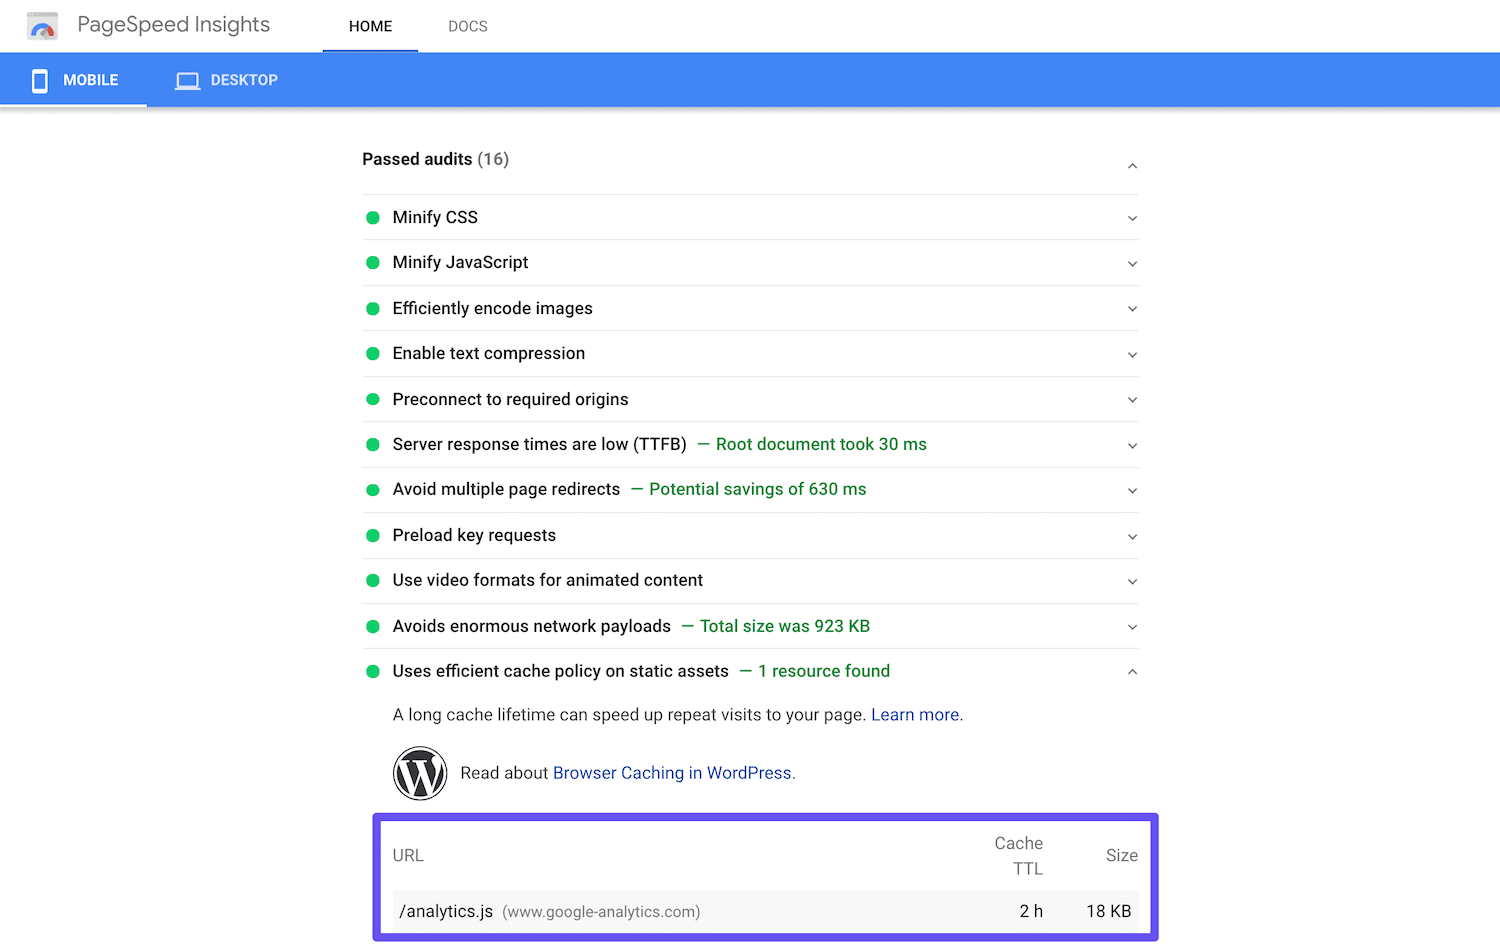
Sometimes Google Analytics can become the cause of this Leverage Browser Caching warning and a low PageSpeed score. Because it has a low cache expiration time of only two hours. In the older version of the Google PageSpeed Insights, it used to show Leverage Browser Caching like this:
Here, the sad part is that you won’t be able to change the Expires header or Cache-Control because the resources of Google Analytics aren’t on your server. You can mitigate this issue by hosting the script locally.
However, avoid hosting referencing JavaScript files locally, such as analytics.js and ga.js, as it’s not supported because Google does not support it. You can overcome this issue by using a WordPress plugin such as WP Rocket, which will optimize the analytics.js file locally for you, or even go for the free WordPress plugin Complete Analytics Optimization Suite (CAOS).
Furthermore, you can get some benefits by hosting the Google Analytics script locally because you will reduce external HTTP requests to Google from two to one. It’ll also provide full control over caching.
Also, to get you started, you’re required to install the plugin and enter the Google Analytics Tracking ID. Once you enter the tracking code into the WordPress website, you’ll need to download and save the analytics.js file within the server and keep it updated, which you can do with the help of the wp_cron() scheduled script.
Note:
If you’re using the CASO plugin, make sure that you don’t install any other Google Analytics WordPress plugin because it won’t work.
Minimize the Usage of Third-Party Scripts
As mentioned, sometimes Google Analytics scripts can become an issue for this Leverage Browser Caching. Likewise, other third-party scripts can also be the reason. For instance, if you have a WordPress website that’s used for handling your business data, you may likely be using some additional third-party scripts for A/B tests or tracking conversions like Facebook conversion pixels, Hotjar, Crazy Egg.
Nonetheless, such scripts can create an issue if not hosted locally, and likewise, you won’t have any control over it if it isn’t on your server.
Therefore, it’s recommended to reduce using third-party scripts as much you can. For example, you can check your website and remove third-party scripts that aren’t important.
What Does the Leverage Browser Warning Mean?
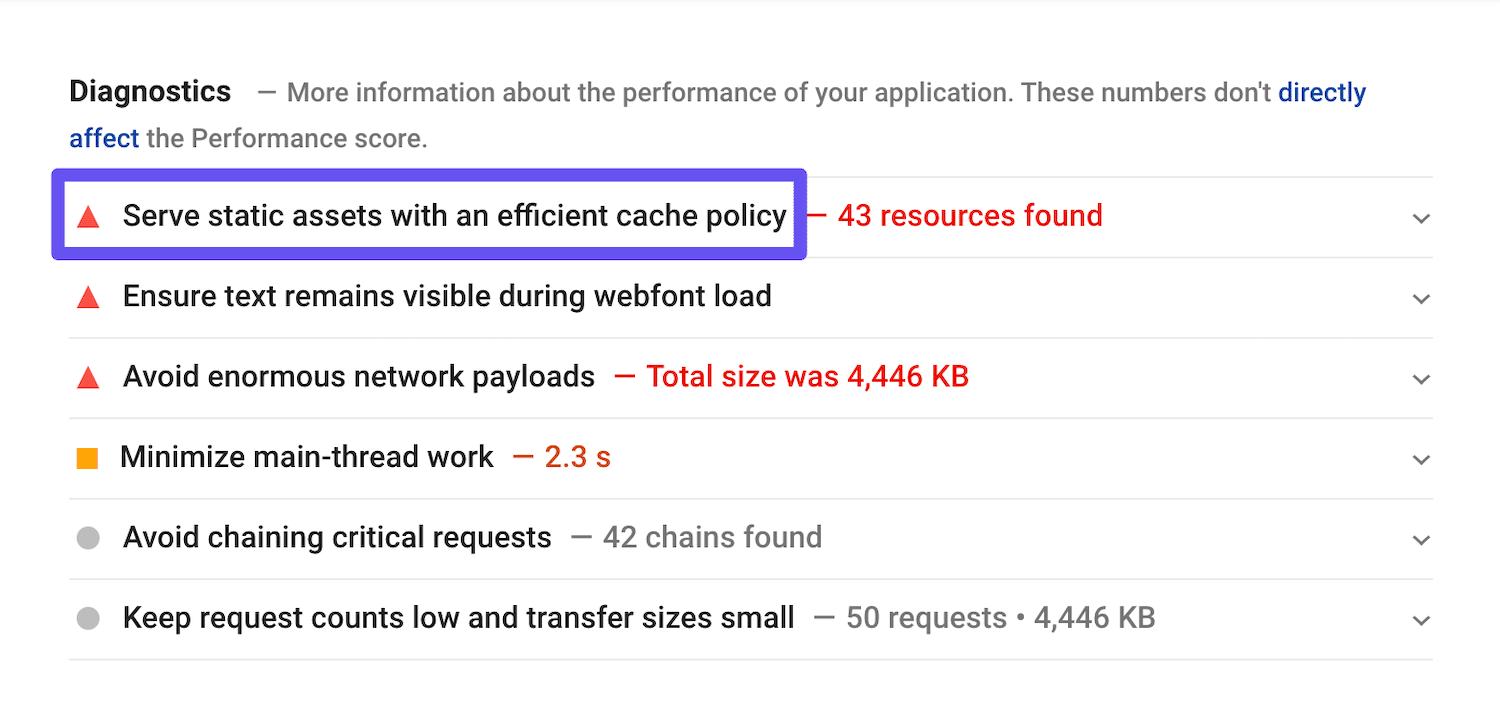
Put simply, the Leverage Browser Caching warning is among many other ‘diagnostics’ warnings Google PageSpeed Insights uses in their improvement recommendations:

On the flip side, whenever someone sets up a method for leveraging browser caching, the browser is instructed to extend the lifetime or expiry date of the resources that are downloaded by the visitors, which also optimizes performance.
For example, by extending the lifetime of the cache or how long a file should stay to become old, you are ensuring that your visitors don’t need to wait for all the same things to get downloaded onto their browser every time they visit your website.
As mentioned earlier in the article, change isn’t significant. But adjusting content expiry dates by adding Cache-Control Headers and ETag Headers within HTTPS headers can make all the difference. Here, the Cache-Control header is used for declaring the caching duration of any file. An ETag is used to verify any change that exists between the requested and cached resources.
The ETag Headers and Cache-Control Headers settings also allow you to specify the period in days, months, or even years, depending on how long you want to store these caching files locally. Though you’re going to change these resources often, so you’ll need to set an expiry date with the frequency that matches the period when you want them to change.
What’s Browser Caching?
Whenever someone visits your website or a web page, the browser requests to download all the resources from your domain’s server. It includes CSS files, JS, HTML, images, text, and other assets for loading and displaying the web page accurately.
So, instead of downloading all the resources repeatedly, each time a visitor visits a different page of your website, the browser uses a Web Caches. The browser’s feature ‘cache’ or ‘temporarily store’ web page assets on the device’s (user’s browser) local storage. And this storage or data is known as ‘HTTP Cache’ or ‘Web Cache.’
Let’s see the inner workings of browser caching.
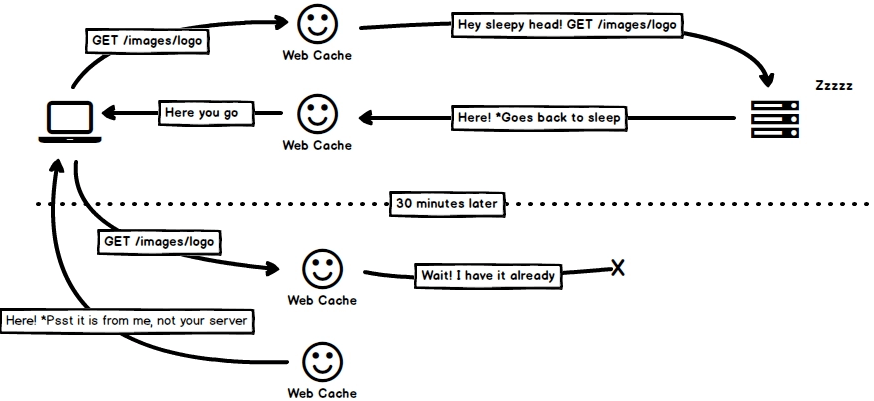
The first-time user’s device asks the server for the logo and other image files, and the request is passed to a web cache that verifies whether it has a copy of the asked for the file saved. If it doesn’t have it, then it moves further to fetch from the server. Likewise, if the user revisited the website, instead of asking the server for the resources, it’ll fetch and provide a copy from its own web caching.
So, whenever any visitor visits your website more than once or different pages of your website, their browser will first use the copy that’s currently present in their temporary cache instead of downloading resources from the beginning. Though, if it’s not present in the cache or else something different is visited at that time, it’ll download that resource from the server.
Many websites have fewer changes from one page to another and because of this, reusing the cached resources helps the page load faster. Also, it helps in reducing the consumption of bandwidth of the web, which in turn reduces server load.
Wrapping Up
Though Google PageSpeed Insights is not the only way of measuring your site’s performance, it still provides a decent indication of how your site performs. For instance, it provides different warnings and recommendations, and resolving such warnings helps to improve your score.
From the pool of different warnings users receive, one is “Serve static assets with an efficient cache policy,” also called “Leverage Browser Caching,” which we’ve discussed how to resolve and improve your site’s performance.
For a quick recap, if you’re getting this warning message when you measure your site performance in Google PageSpeed Insights, you can resolve it by:
- Adding Expires or Cache-Control headers.
- For Google Analytics, leverage browser caching.
- Reducing the usage of third-party scripts.
FAQ
What’s the Easiest Way to Resolve Leverage Browser Caching?
The easiest way of enabling leverage browser caching within your WordPress website is to install a WordPress plugin that allows you to specify the caching lifetime of different static contents. Another alternative method is by specifying the stipulated amount of time within your site’s .htaccess file.
How to Enable Caching Within WordPress Website?
For enabling caching within your WordPress website, simply install a readily available WordPress plugin that allows different cache levels and a page-level cache, browser-level caching, and server-level caching. For instance, WP-Rocket is one of the best options, but other free options can also help make your website perform better and load faster.
How to Leverage Browser Caching for Third-Party Scripts?
It’s recommended to limit the usage of third-party scripts, such as Facebook Pixel code, Hotjar, Crazy Egg, and so on. It’s because they’re set on the server-side, and you don’t have any control over them.