
StatsCounter.com data shows that Google has 92.03% of search engine market share globally (as of August 2021), which means you don’t want to get on that search engine’s bad side (i.e., blacklisted). Here are your step-by-step instructions on how to remove the Google Blacklist warning from your website if your site is one of them

The Google blacklist (or what may otherwise be known as the Google Blocklist) is the search engine’s way of calling out dangerous websites and removing them from their site index. Security warnings from Google can indicate that the website is hacked and for website owners, diagnosing the issue can be frightening. If you think your website is blacklisted, read on to learn what you can do about it.
Let’s get into the details on what a Google Blacklist is, how websites end up on it, how to tell if your website is one of them, and what you can do to remove the Google Blacklist warning from your website.
Why Google Blacklists Websites
Google Blacklist is an unofficial term that’s used to describe websites that get delisted from Google’s search index for one reason or another relating to security concerns. Basically, these sites are de-indexed and removed from the search engine’s results page (SERP) listings. Forget ranking in the top 10 — you won’t be in their index at all!
If you’re facing complaints from visitors who say that your site is flagged and that they see warnings that it is “not safe,” you have a problem. You may even find site warnings in Google search results when you search for your web pages. If warning messages are displayed, it could be because your site has been hacked or it doesn’t meet Google Webmaster’s Quality guidelines (or violates their policies) for other reasons.
Your Website Has Been Hacked
If someone hacks your website, they can use that platform to cause a lot of damage — both to your organization and to your customers. After all, they can use it to upload false or malicious content, steal data, or link off to phishing or scam websites. As such, if your website is hacked or hijacked by malicious actors, it will be blacklisted by Google to keep users safe. Google is among the most popular search engines globally, and they do not like to risk their users’ safety.
But what if your website hasn’t been hacked? Yes, your site could still be blacklisted by Google for other reasons.
You’re Using Black Hat SEO Techniques for Ranking Your Website
Black hat SEO is a practice that still exists among some SEO consultants — and Google doesn’t like it. If you’ve consulted an SEO expert who uses black hat SEO techniques, then there’s a chance of Google blacklisting your site. Some of the black hat SEO techniques that lead to blacklisting are:
- Paying other people to display links to your website
- Adding keywords to your website that aren’t related to the content you’re posting
- Intentionally asking people to click certain links of your website
These are some of the few black hat techniques that Google hates.
You Have Scraped, Copyrighted or Otherwise Plagiarized Content On Your Site
Whether accidentally or intentionally, if you use a copyrighted image on your website or the content writer of your website copies and pastes content from another website, then there’s a risk of your site getting blacklisted by Google.
Therefore, before you publish any content, image, video, or audio on your website, be sure that:
- You’re aware that it is original and not copied from elsewhere, or verify
- You have the right to use it and are displaying the proper usage license and source credit, if necessary. If the rightful owner finds copied content on your site, they can report you and your website could be blacklisted.
For any or all of these reasons, Google Safe Search may add your domain — or a specific web page from your domain — to the Google Blacklist.
Google Blacklist Check – What Users See When Your Website Is Blacklisted
If you come across security warnings like “This website has been reported as unsafe,” then it’s likely that all (or part) of your website is blacklisted. When a blacklisting occurs, you’ll see many types of Google security warnings such as:
- “This website has been reported as unsafe.”
- “This site may harm your computer.”
- “The site ahead contains malware.”
- “This site may be hacked.”
For example, here’s how it looks in Google search results:


A both screenshots of example security warning messages that display in Google’s search results.
Google Blacklist warning messages are pretty vague, and they differ from browser to browser. Google Chrome will display a different warning from Mozilla Firefox, and the warning in Safari will be different as well.
A screenshots of example security warning messages in Google Chrome Browser

A screenshots of example security warning messages in Mozilla Firefox Browser

A screenshots of example security warning messages in Safari Browser

A screenshots of example security warning messages in Internet Explorer
Other Signs That Indicate Your Site Is Blacklisted By Google
The blatant warning messages we shared above aren’t the only indicators that let you know something’s amiss. You also might witness one or more of the following if Google has blacklisted your site:
- Your website is entirely or partially blocked by antivirus software.
- Whenever you try visiting your site, a warning page blocks it from loading.
- Your hosting provider notifies you about it or takes down your site.
- There are site redirects in SERP and SEO spam links that you didn’t add.
- You observe changes to the appearance and files of your site that you didn’t make.
How to Determine Whether Your Website Is On the Google Blacklist
Google now considers your website dangerous and will treat your domain as harmful. As such, you may receive an email from Google informing you that your website (or a portion of your site) is infected with malware and has been blacklisted by Google. You may also see a notification in your Google Search Console.
However, there are a few other ways to determine whether your site is blacklisted.
You Can Check Your Google Search Console for Blacklist Warnings
The Google Search Console is the best place to find an answer about whether Google has blacklisted your site. You can check your site’s Google Blacklist status by going to the Security tab and selecting the security issues option from the list (located in the Security & Manual Actions portion of the menu):
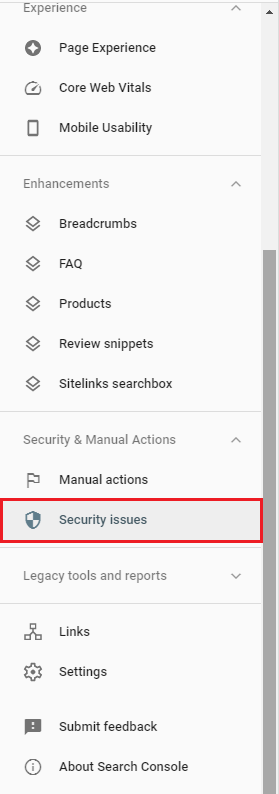
Screenshot of security and manual actions section
Once there, you’ll want to view any infected web pages that might be listed there:

A screenshot example of a detected issue that can display in Google Search Console.
Under the Detected Issues section, click the Learn more option next to the specific issue to determine which section of your website has been affected. Use the Test Live URL tool to inspect specific pages to get a better idea of how far the issues extend:

Screenshot of the URL inspection window.
The next step is to determine whether this page (or multiple pages) still exist on Google’s search index or if Google has de-indexed them. You’ll want to check each URL here individually.

A screenshot of a de-indexed website URL.
You Can Verify Your Site’s Blacklist Status Through the Google Safe Browsing Tool
If you haven’t set up a Google Search Console account, no worries — there’s another way to verify your site is by using the free tool Google Safe Browsing. It’ll check all your website URLs and let you know whether Google has blacklisted your website or not.

A screenshot of Google’s Safe Browsing tool.
Once you confirm that your website is blacklisted by Google, the next step you should take is to clean up your site.
How to Remove the Google Blacklist Warning From Your Website
The way to remove the Google Blacklist warning messages from your website is by mitigating the issues that are causing them to appear in the first place. This process involves removing any malicious content from your website or anything else that goes against Google’s webmaster guidelines that we mentioned earlier. After that, you’ll need to submit a request for manual review for Google to consider re-indexing your site.
Scan and Clean the Malware on Your Website
There are two ways to scan and clean the malware on your website. The easiest and recommended way is by using a website security tool. The other way is to remove the malware manually, which we do not recommend unless you’re a professional with hands-on experience in coding.
Let’s understand how both these methods work using WordPress websites as an example. (We’re using WordPress specifically as an example since 42% of the world’s websites are WordPress sites.)
Option #1: Manually Remove Malware and Malicious Code From Your Site
This manual process of scanning and removing malware and other malicious code involves:
- Finding such items in your site’s core files and folders. This is a time-intensive process and often involves trying to find appropriately named but out-of-place files within your files and folders.
- Cleaning your database tables. This process is all about identifying and manually removing any malicious code or files containing malware and spammy keywords.
- Removing any backdoors that may exist within your website. Backdoors are vulnerable entry points attackers can use to gain access to the backend of your website. This access enables them to make changes to your content or even steal data. Removing backdoors is essential to stop hackers from reinfecting your site or causing your site to get blacklisted by Google again in the future.
Be sure to check out our other article on how to check your website for malware for additional information.
Of course, once you remove suspicious or malicious files and data from your site’s folders and database, be sure to check your site to make sure nothing is broken or not working. If your site stops responding after you make the changes, it’s recommended that you immediately restore your site from a previous backup, install WordPress security plugin and clean your site.
Once you clean and remove malware from your website, you’ll have to request that Google verifies your website and removes all the de-indexed pages from the Google blacklist to bring it back into the search results.
Option #2: Use a Website Security Tool That Simplifies This Process
Of course, there’s a much easier way of doing this: simply use the right tool to save yourself a lot of time and frustration. Frankly, many website security tools are available in the market. One of the easiest ones to use is CodeGuard Backup, which offers instant website backup and other features like MalwareGone to detect and remove malware from your website. It also comes with a WordPress plugin, making it a good choice for a newbie who doesn’t have any coding knowledge.
Submit a Review Request to Remove Your Site From Google Blacklist
Now, for one of the most important steps regarding how to remove the Google blacklist warning: request that Google removes your site from their blacklist. Of course, this process takes more than asking “pretty please” — the search giant needs to know that you’ve taken the necessary steps to ensure that your site is clean of malicious content before they’ll even consider removing the blacklist warning.
To submit a Google Blacklist removal request, you’ll need to access your Google Search Console account and follow the steps below:
1. Log back into Google Search Console. Once there, you’ll need to go to Security Issues under the Security & Manual Actions section to review the issues found by Google.
2. Select the ‘I have fixed these issues’ checkbox. Not much else to say — hit this and move on to the next step.
3. Click the button labeled Request a Review. Doing this will take you to the main step in the process of getting the ball rolling on Google’s manual review of your site.
4. Explain everything you’ve done to mitigate the issue(s). This includes talking about the steps you took to remove the harmful content from your website to remove the Google Blacklist warning. (Note: since this process involves a manual review by Google, be as precise as possible. This is not the time to take a shortcut to save time.) If multiple URLs have been blacklisted, you’ll need to repeat the same steps for each one separately.
5. Click the Submit Request button. Yup, once you’ve completed the above steps, just hit submit — that’s it. Of course, the results won’t be instantaneous as this process can take several days for your site to be removed from the Google blacklist and re-indexed. Just be patient and wait for Google to do their thing.
Closing Thoughts On How to Remove the Google Blacklist Warning From Your Site
We hope this guide helped you remove the Google blacklist warning from your site. However, you should be aware that your job isn’t over yet. Once your site is back up and running, you’ll have to ensure that your site doesn’t get hit by the Google blacklist warning again.
To make sure your site never ends up on the Google Blacklist again and to prevent further damage to your brand or company’s reputation, it’s critical to take all the necessary security measures and protect your site from cyber attacks.
Multiple Layers of Website Security to Keep Hackers at Distance
Get DigiCert Secure Site Pro OV SSL that includes a vulnerability scanner, malware detector, PCI scanners, website backup, multi-domain security, and many more advanced security tools.Get DigiCert Secure Site Pro OV SSL